 VN
VN 












_PJg1V.webp)
Guide to Obtaining Google Gemini API Key for Using AI Automated Content Writing Tools
AI is becoming an indispensable assistant in content creation and SEO. By integrating the Google Gemini API Key, you can use AI tools to generate SEO-optimized articles, streamline your workflow, and enhance website management efficiency.
If you don't know how to get an API Key, don't worry. In this article, MIMA Digi will guide you step-by-step on how to create and integrate a Google Gemini API Key into your system in just a few minutes.
What is Google Gemini API Key?
A Google Gemini API Key is an authentication code provided by Google that allows your website or software to connect with the Gemini AI model.
Once the API Key is added to your system, you can use features such as:
- Automated article writing with AI
- Assistance in creating SEO-optimized content
- Writing product descriptions
- Writing blog posts
- Creating Fanpage content
- Support in brainstorming Marketing content ideas
API integration only needs to be done once and can be used long-term.
Why is it necessary to create a Google Gemini API Key?
Creating an API Key offers numerous benefits:
- Direct connection to Google's Gemini AI.
- Generate content quickly in just a few seconds.
- Save time writing articles.
- Increase work efficiency.
- Support for building SEO-optimized content.
- Automate the Content production process.
This solution is chosen by many businesses, SEOs, and Content Marketing professionals.
Detailed Guide on How to Obtain a Google Gemini API Key
Follow the steps below to successfully create an API Key.
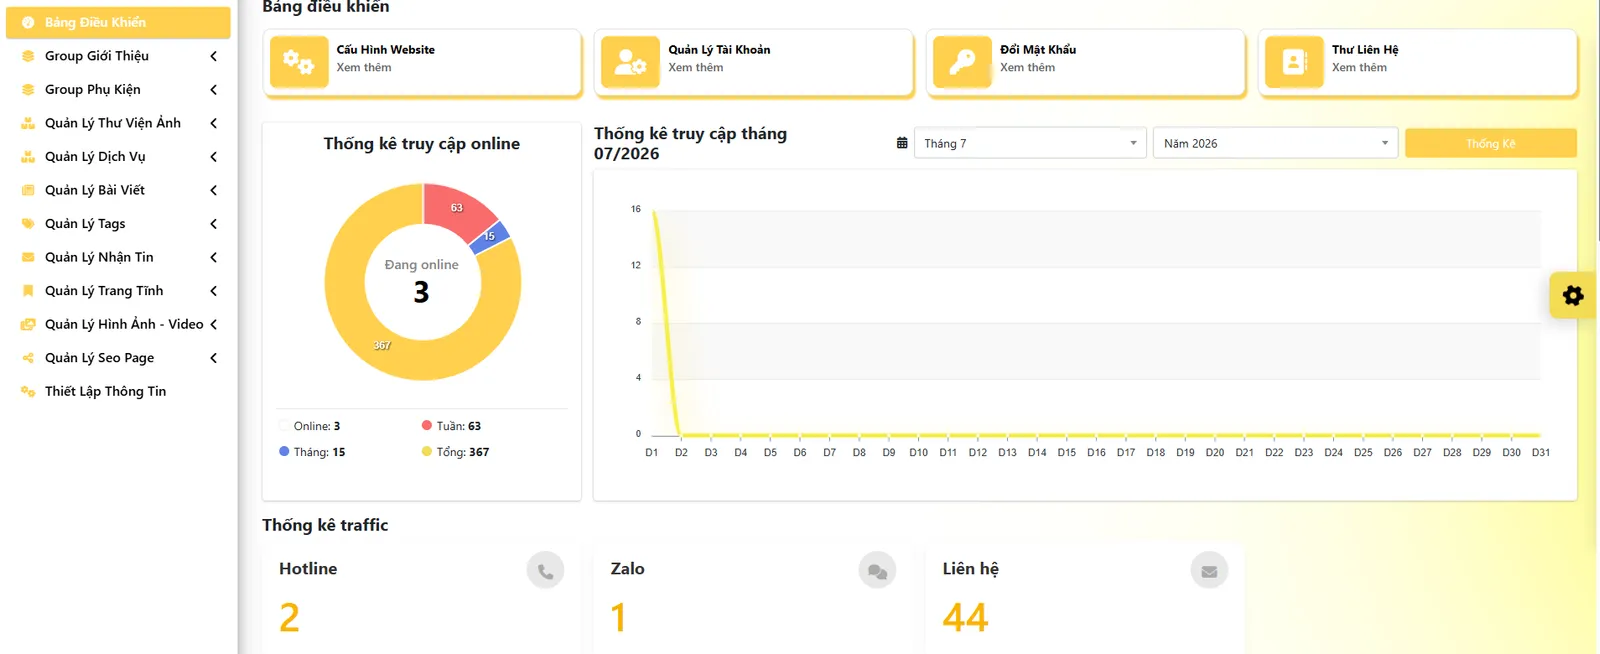
Step 1: Log in to the website
First, log in to the website using the AI content writing tool.
After successful login, the system will display the administration interface for you to proceed with API setup.
Contact us now: 0909 035 333
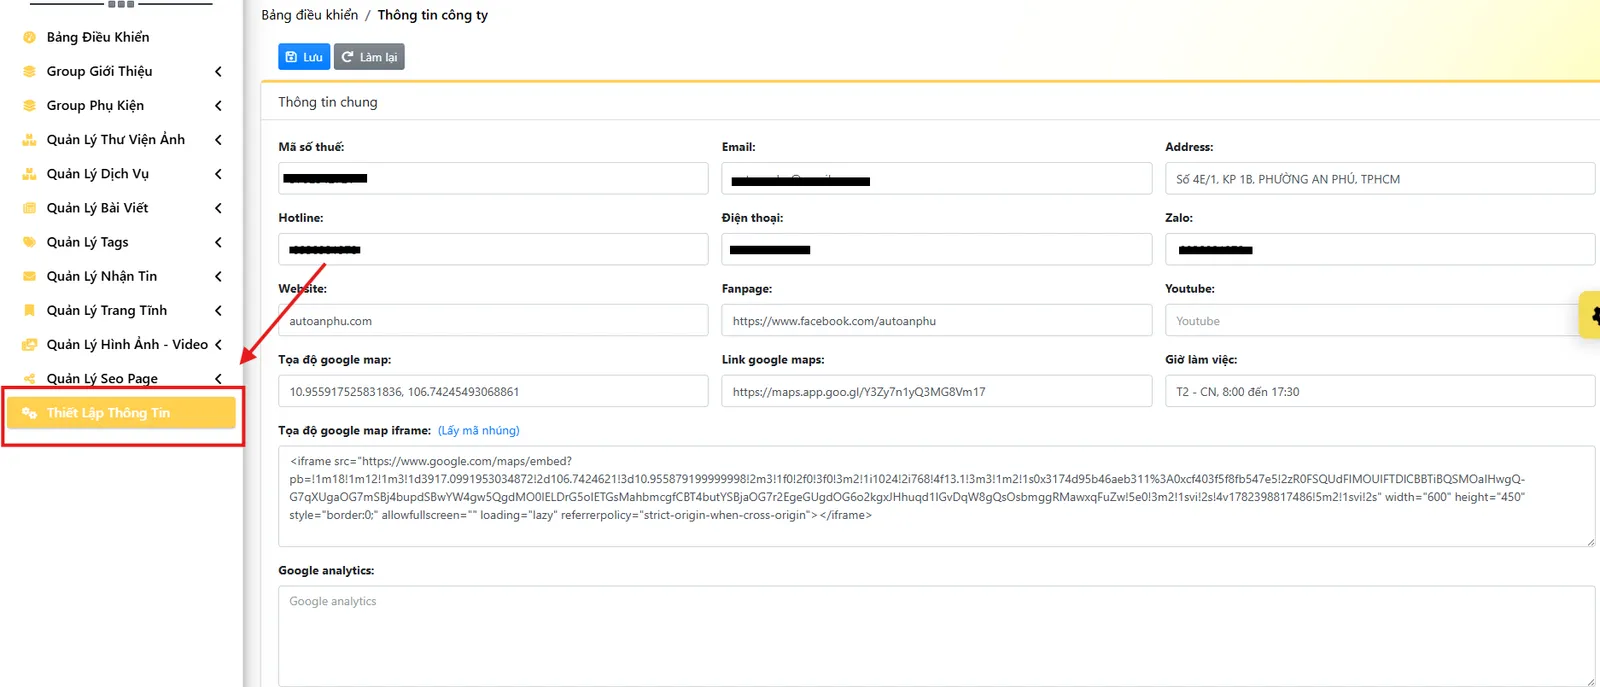
Step 2: Go to Information Settings
On the administration interface, select Information Settings.
Scroll down until you see the section:
Google API Key
This is where AI connects with the website.
Contact us now: 0909 035 333
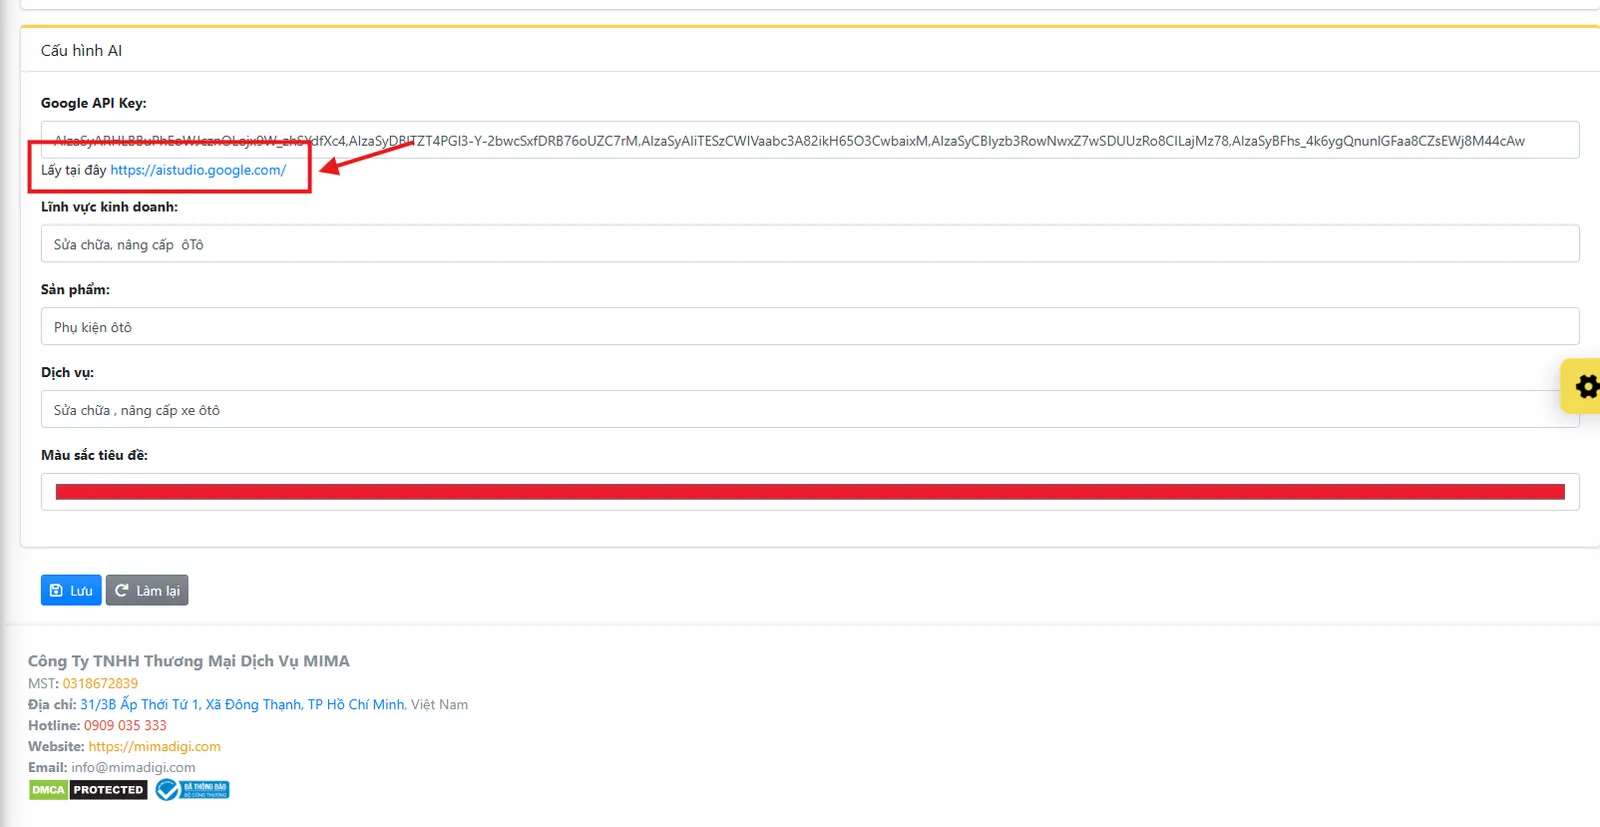
Step 3: Click on the blue link in the Google API Key section
In the Google API Key section, you will see a blue link.
Click on this link to go to Google's API creation page.
Contact us now: 0909 035 333
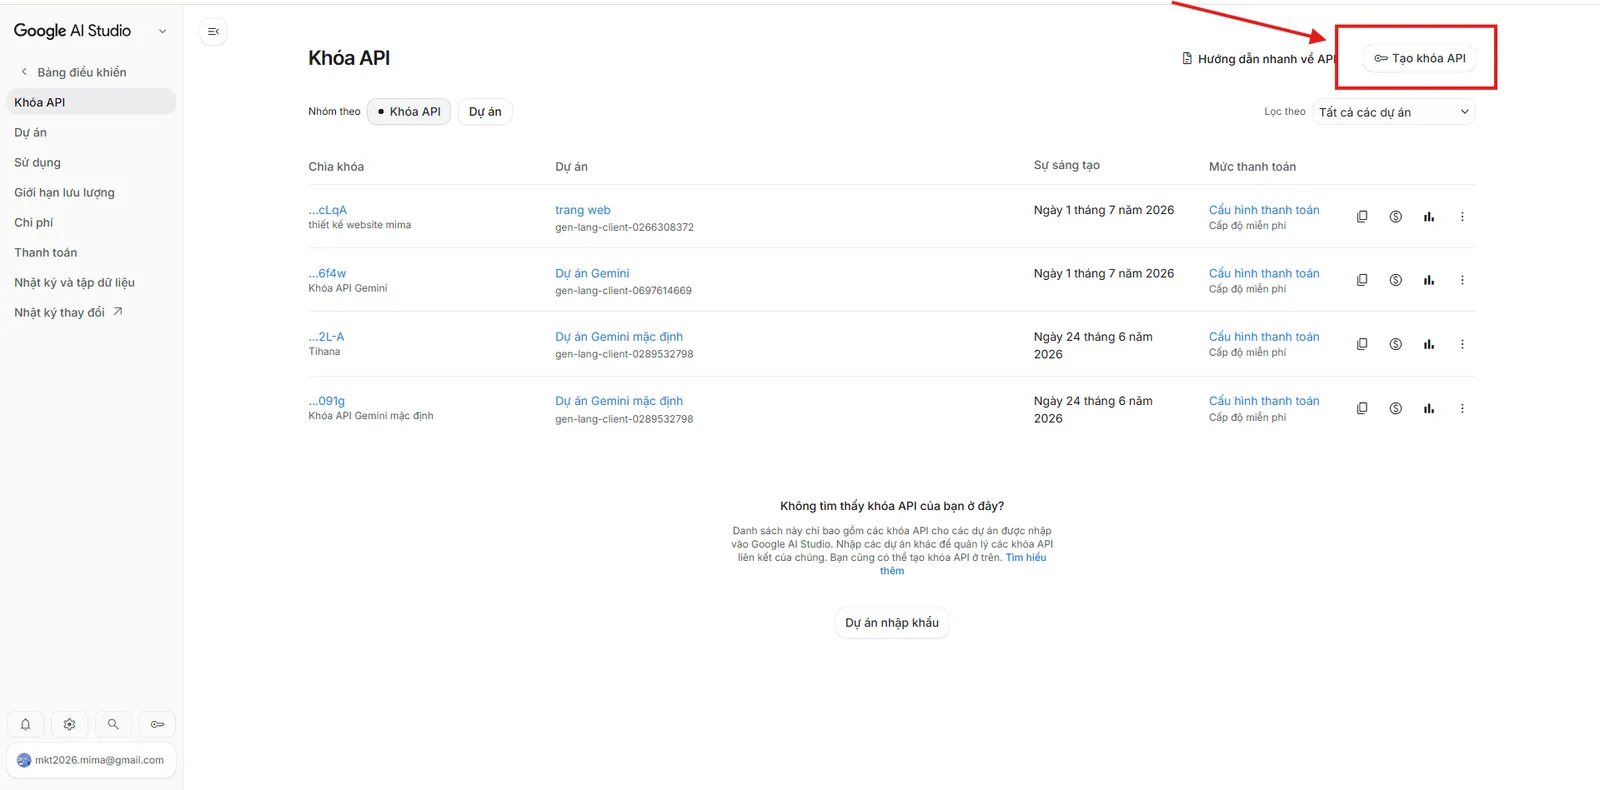
Step 4: Select Create API Key
After navigating to Google's API management page, you will see the button:
Create API Key
This button is located on the right side of the screen.
Click here to start creating a new API Key.
Contact us now: 0909 035 333
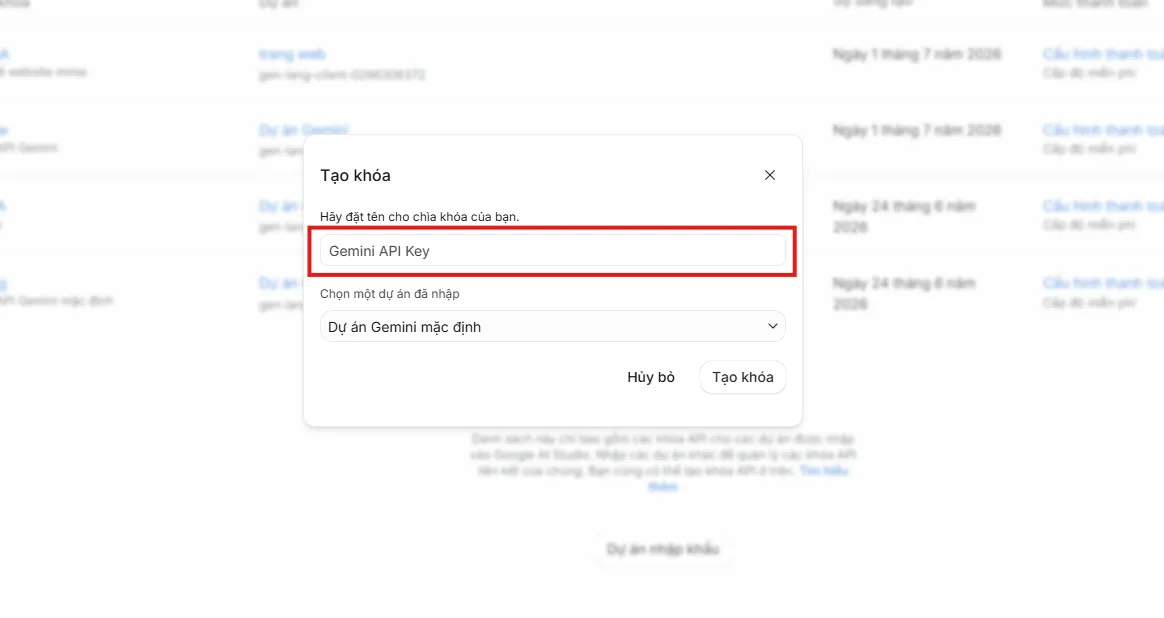
Step 5: Name the API
Google will ask you to enter an API name.
You can name it according to its purpose, for example:
- Gemini SEO
- AI Content
- Website AI
- Content Marketing
It's advisable to use an easy-to-remember name for convenient management later.
Contact us now: 0909 035 333
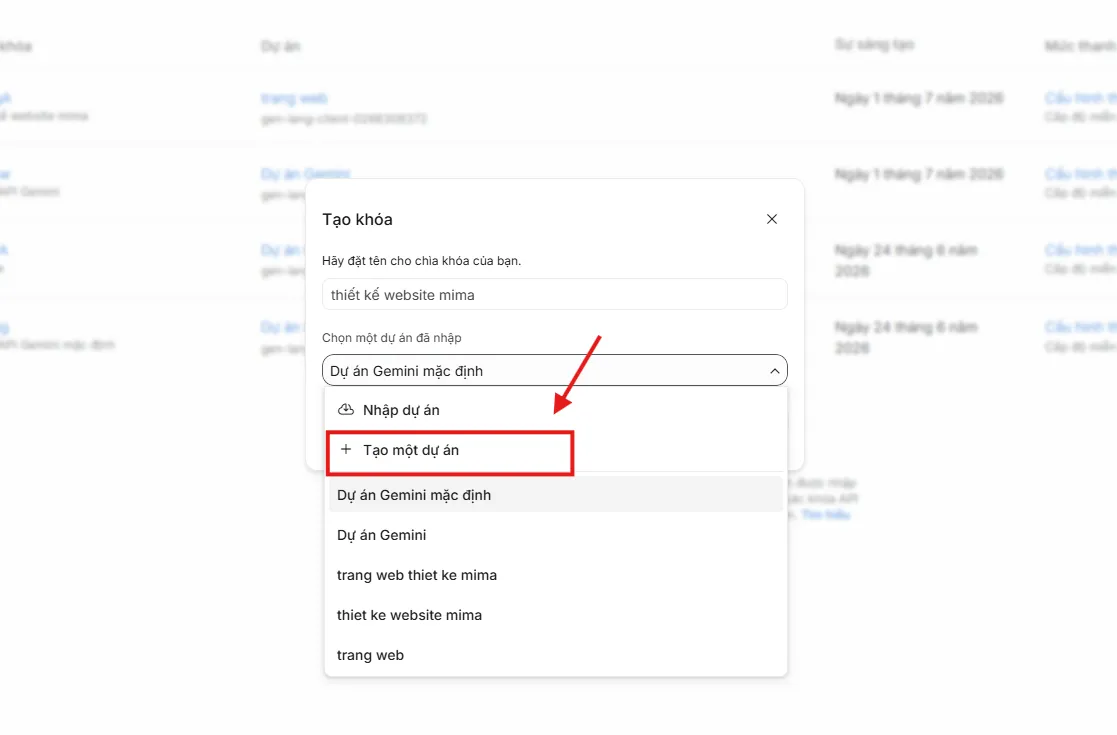
Step 6: Select Project
After naming the API, click the button:
Create a project
to create a new project.
The project will contain the API Key and related information.
Contact us now: 0909 035 333
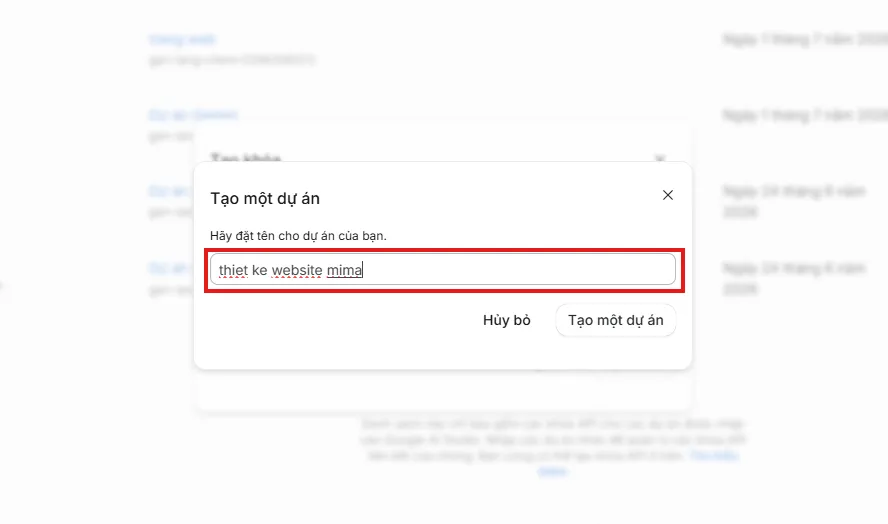
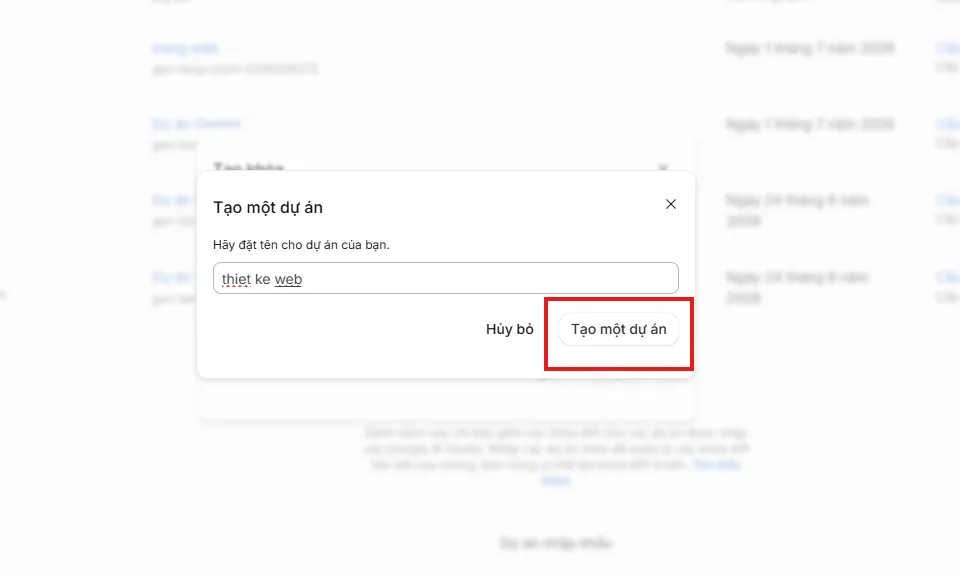
Step 7: Enter project name
Next, enter a name for the project.
Note:
The Project name should not be the same as the API name set in Step 5.
Example:
API Name: MiMa SEO-optimized website design
AI Writer
Project Name: thiet ke website mima
SEO Content project
Using different names will help you manage more easily when using multiple APIs.
Contact us now: 0909 035 333
Step 8: Click Create A Project
After entering the project name, continue by clicking:
Create A Project
Google will automatically create the project and API for you.
This process only takes a few seconds.
Contact us now: 0909 035 333
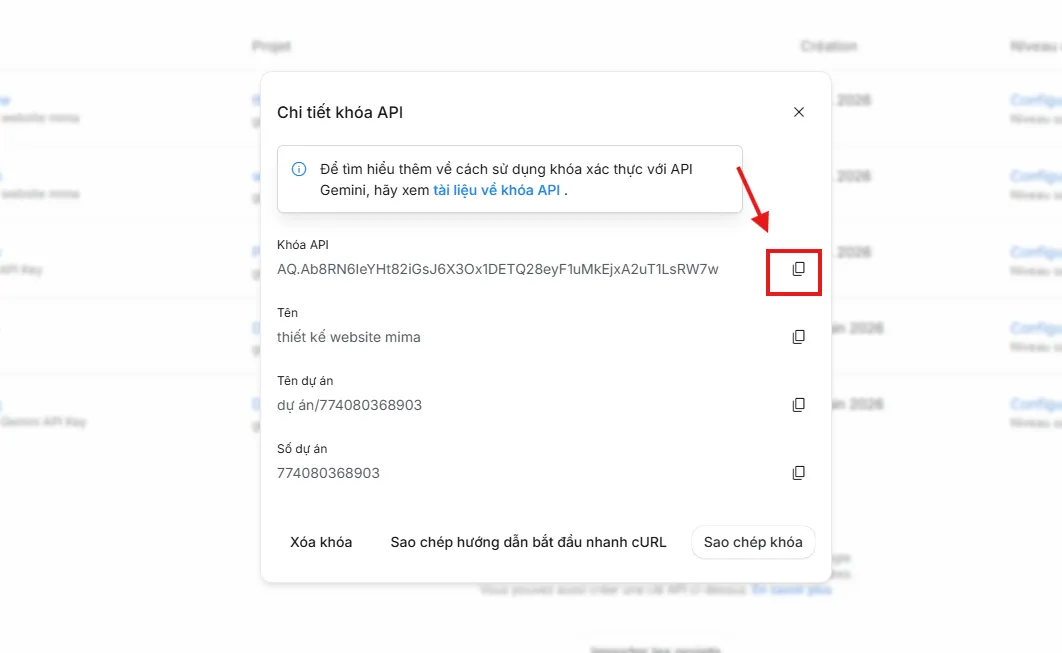
Step 9: Copy API Key
After successful creation, Google will display the section:
API Key
You just need to click Copy to copy the entire API Key.
Note:
Do not share the API Key with others to prevent unauthorized use.
Contact us now: 0909 035 333
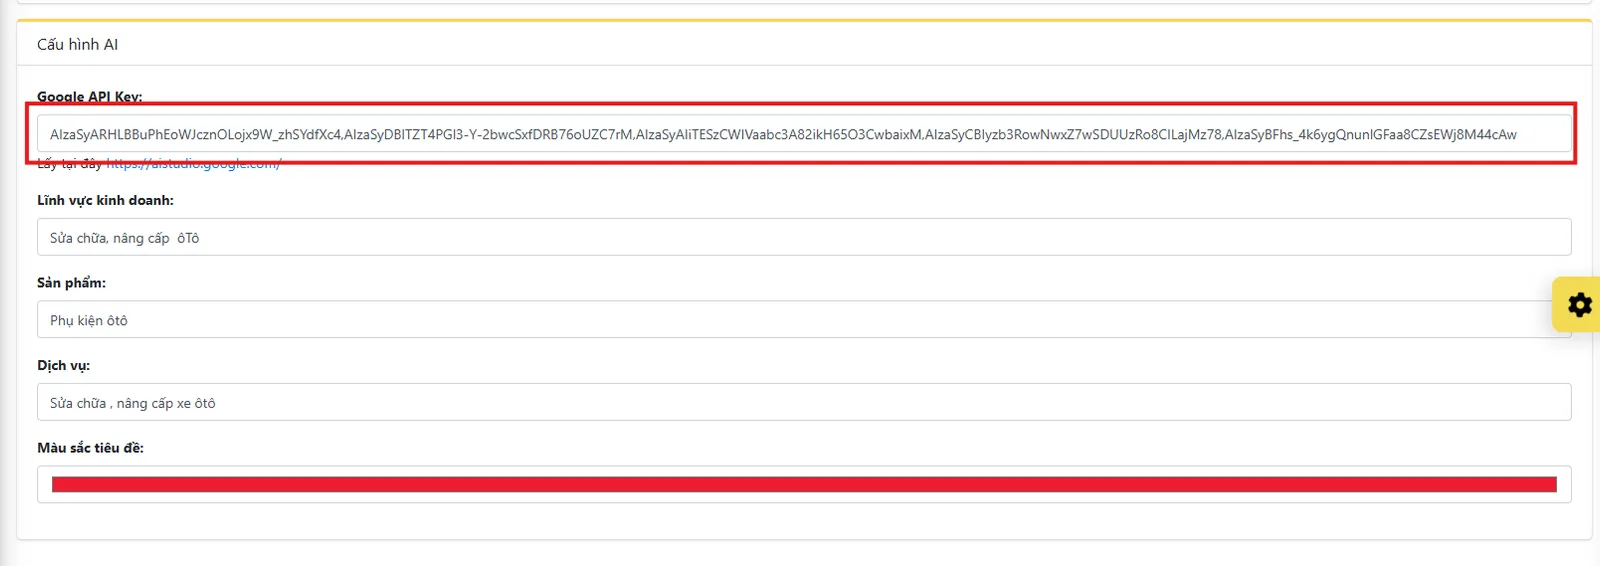
Step 10: Return to the website
After copying the API Key, return to the website.
Then go to:
Information Settings
→ Google API Key
to proceed with the connection.
Contact us now: 0909 035 333
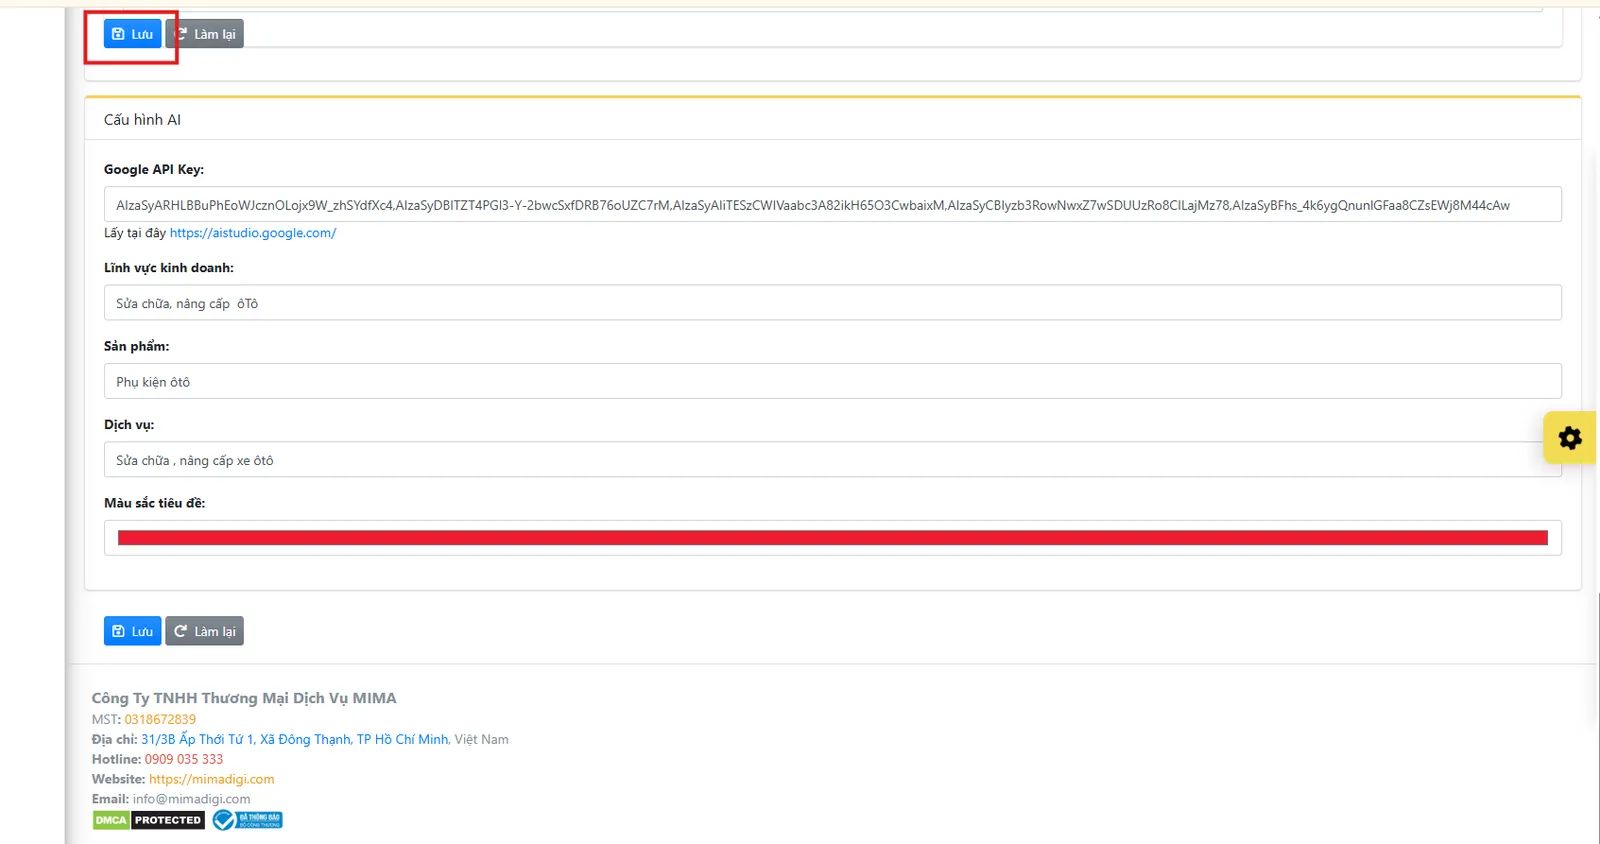
Step 11: Paste the API Key and save
Paste the copied API Key into the field:
Google API Key
Then click Save.
If the API is valid, the system will successfully connect with Google Gemini AI.
From this point on, you can use all the AI-powered content writing features on the system.
Contact us now: 0909 035 333
Note: You can enter multiple Gemini API Keys into the Admin, separated by commas (,). To get more quota, use API Keys from different Gmail accounts, as each account will have its own usage limit.
Benefits of Integrating Google Gemini API into AI Content Writing Tools
After completing the API connection, you can:
- Write SEO-optimized articles quickly.
- Generate a large volume of content in minutes.
- Support writing blog posts, news articles, and product descriptions.
- Optimize the working time of the Content team.
- Increase SEO and Marketing efficiency.
- Improve content quality with AI support.
This is a suitable solution for individuals, businesses, SEO Agencies, and entities that regularly produce content.
Creating and integrating a Google Gemini API Key is not overly complex if you follow the instructions above correctly. With just a few minutes of setup, you can connect your system to Gemini AI and effectively leverage its automatic content generation features.
If this is your first time, follow each step sequentially and recheck the API Key before saving to ensure the connection process is successful.
Guide to Creating a Groq API Key for Using the Latest AI Tools in 2026
What is a Groq API Key?
A Groq API Key is an authentication key that helps connect applications with Groq's AI platform. After creating an API Key, you can integrate it into software or AI tools to use the high-speed language models provided by Groq.
If you are using MIMA Digi's AI content writing tool, simply create an API Key and paste it into the settings to start using it immediately.
Detailed Guide to Creating a Groq API Key
Follow the steps below to create a Groq API Key in just a few minutes.
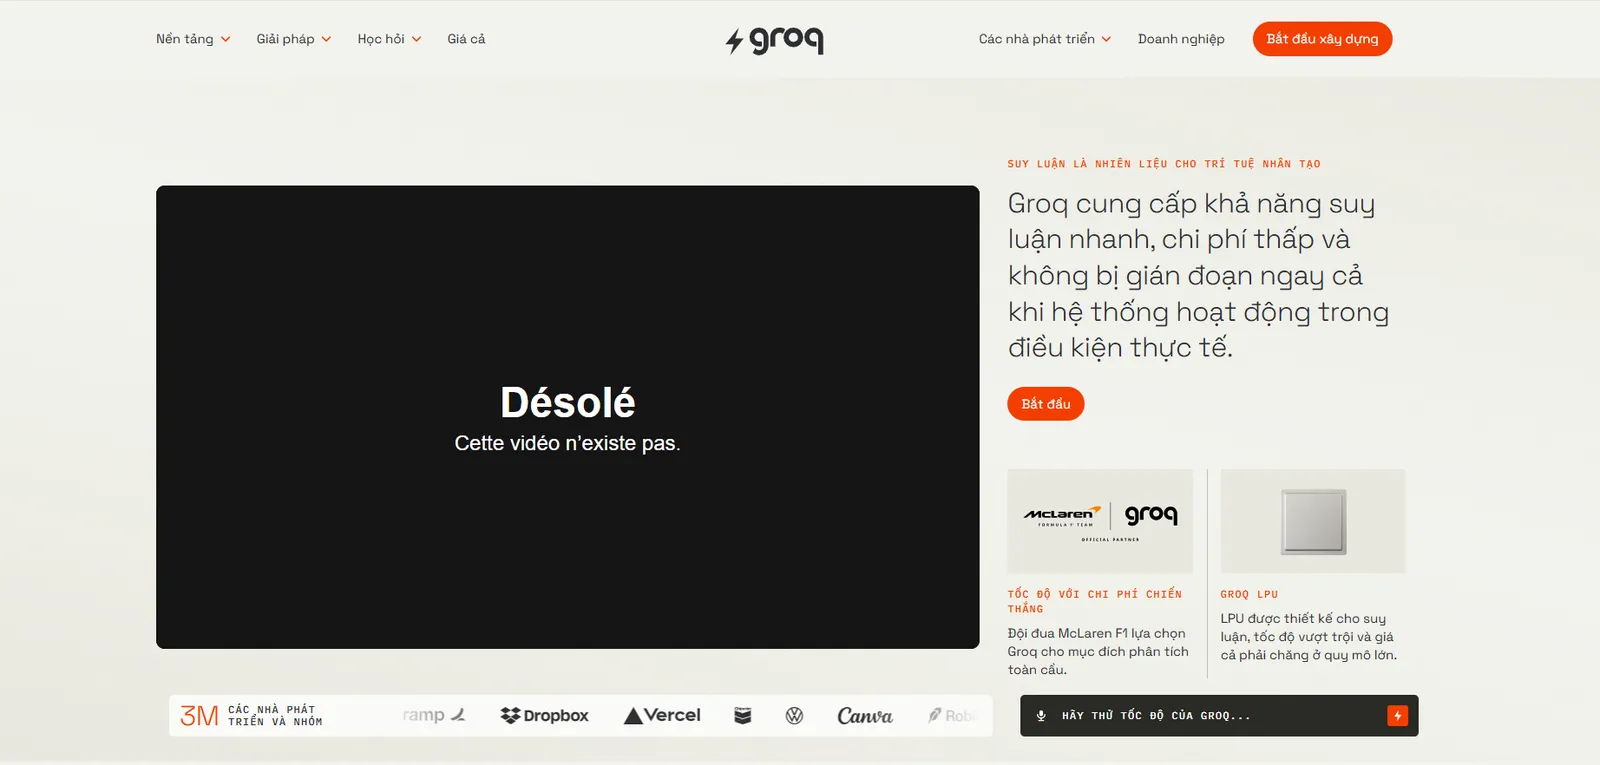
Step 1: Access the Groq website
Open your browser and visit:
This is the official homepage of Groq.
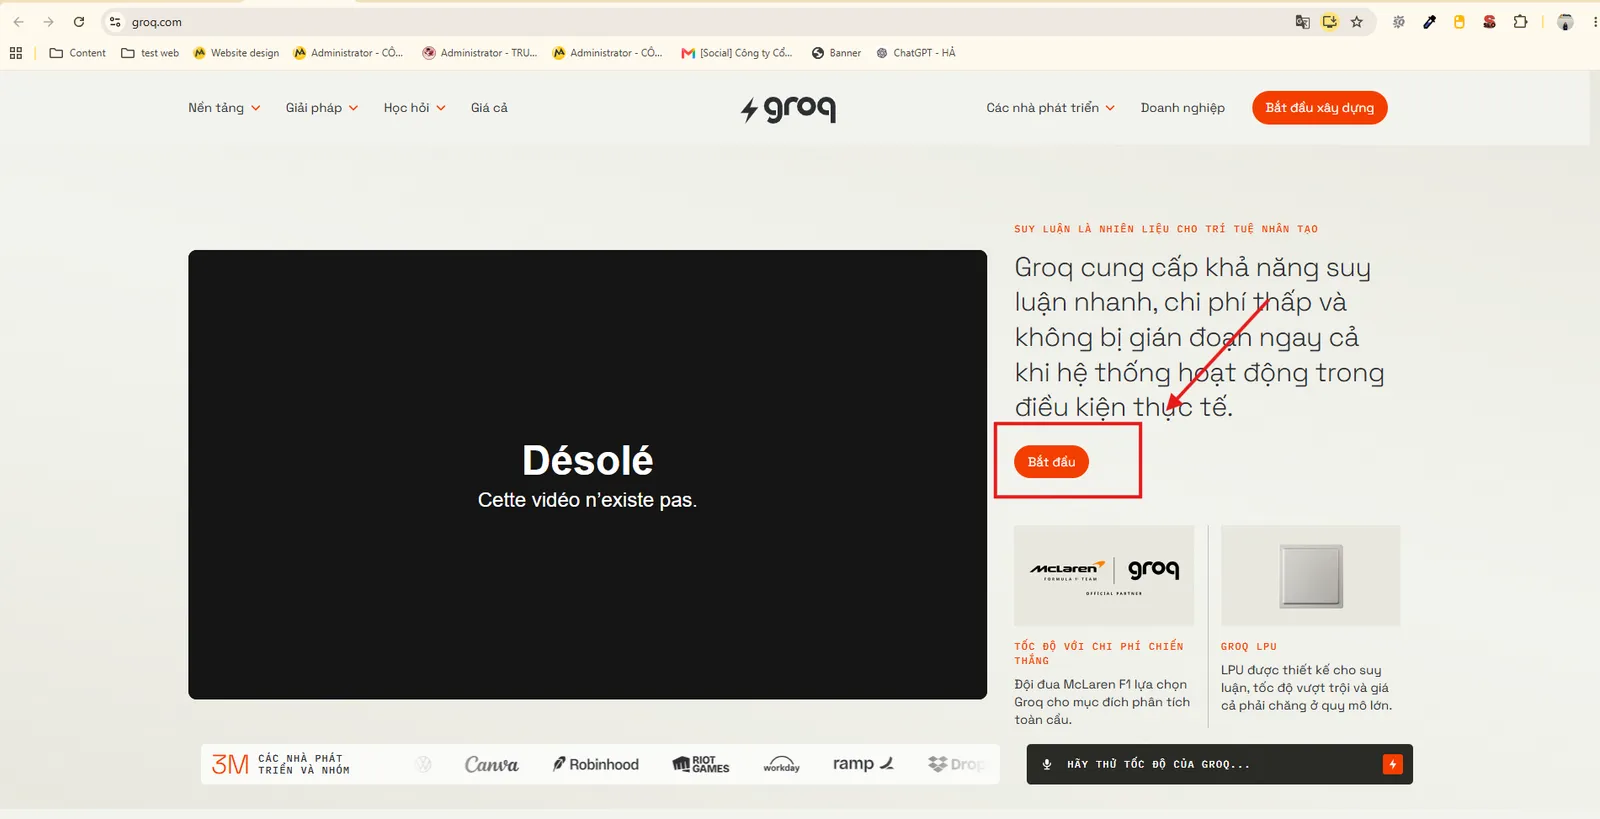
Step 2: Select Get Started
On the homepage interface, click the Get Started button to begin the registration or login process.
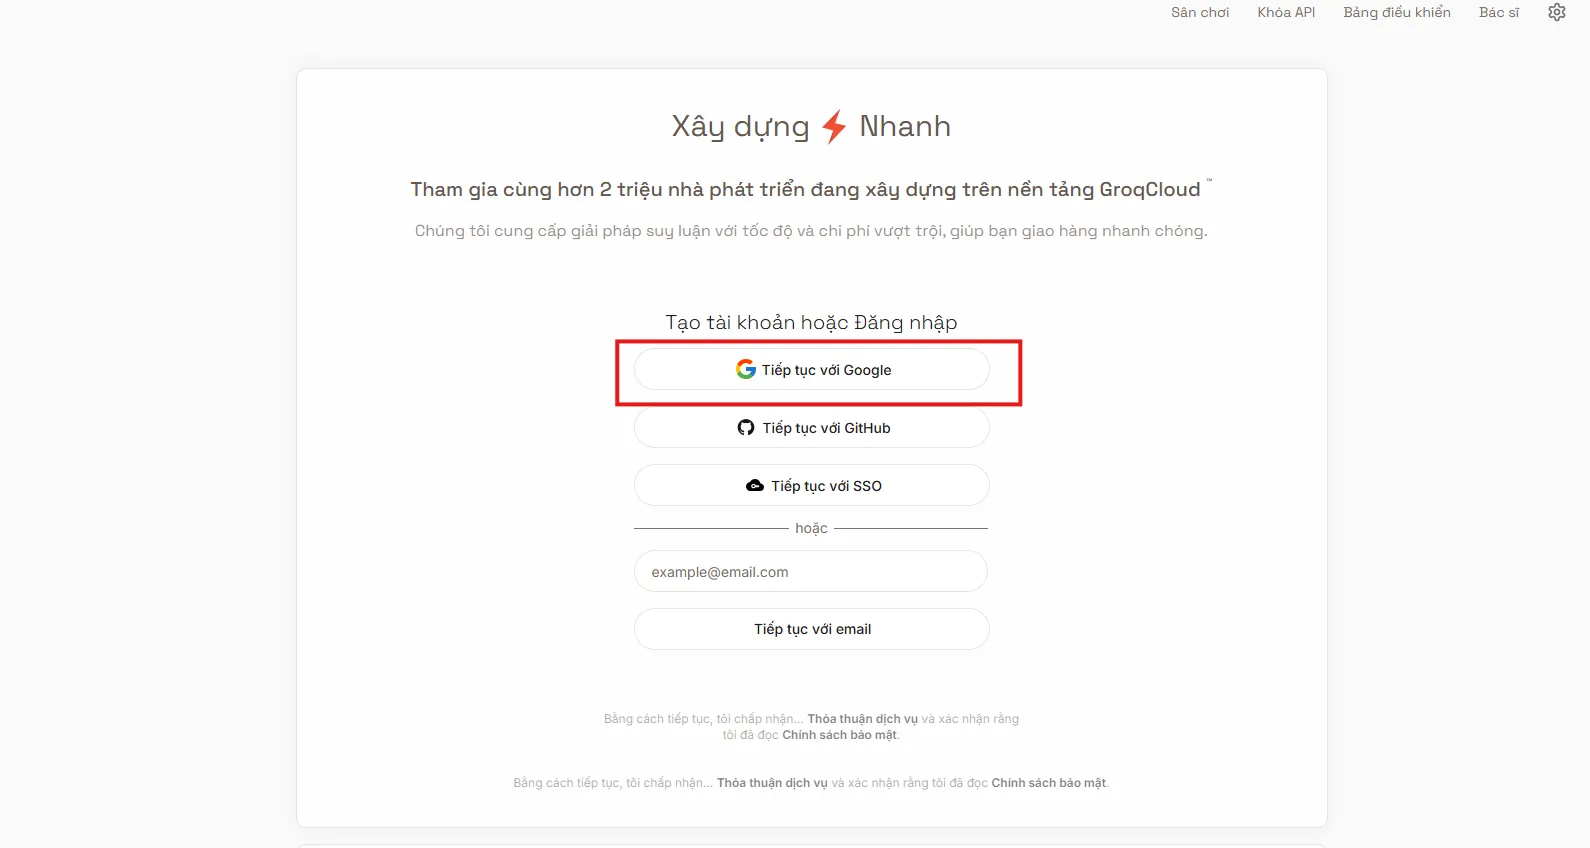
Step 3: Log in to your account
Groq supports logging in through various methods such as:
- GitHub
Choose the account you wish to use to log into the system.
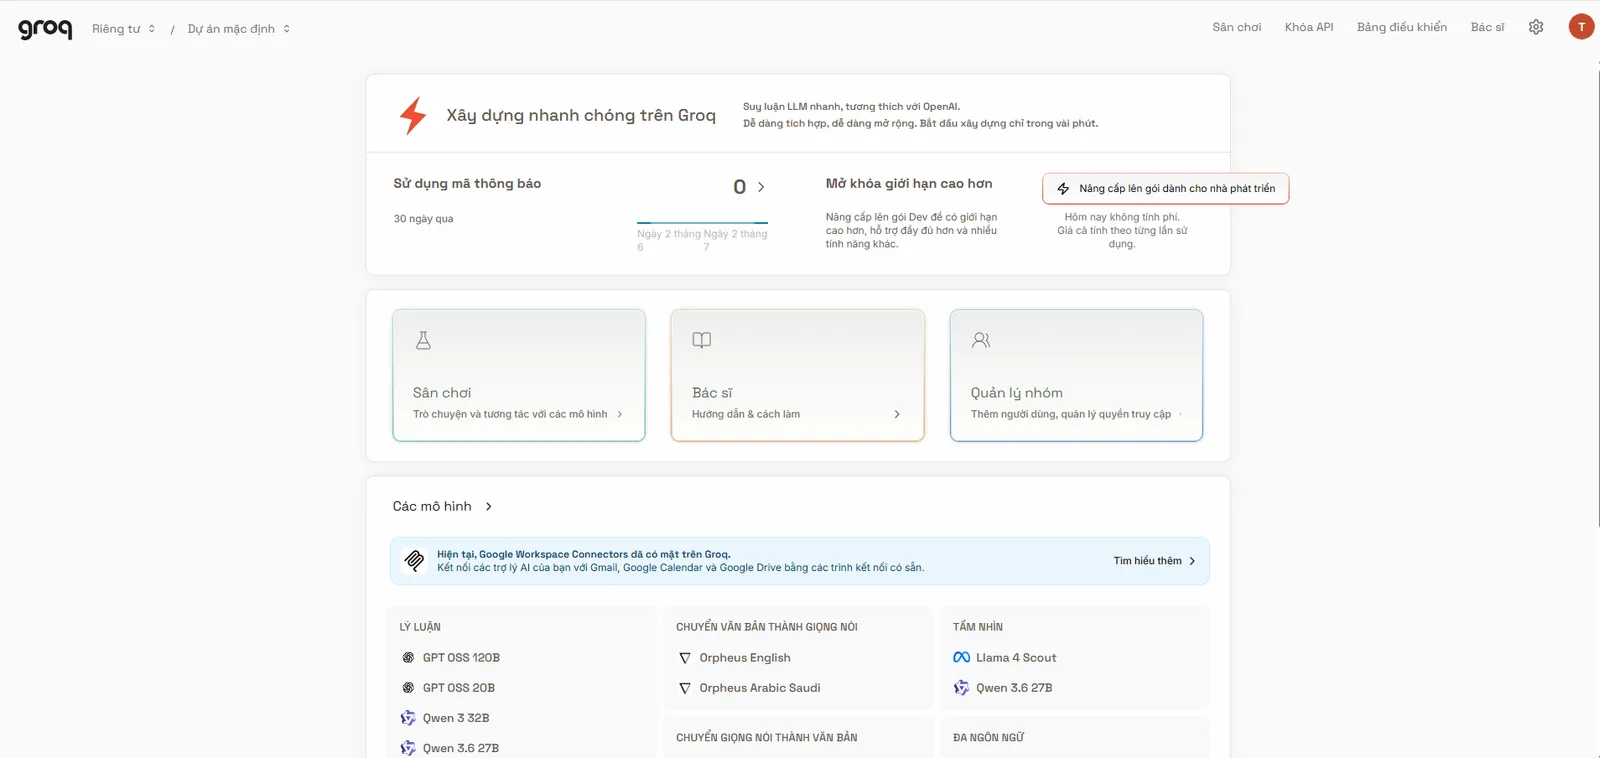
Step 4: Access the Groq management page
After successful login, the system will redirect you to Groq's management page (Dashboard).
This is where you manage AI models, API Keys, and account settings.
Step 5: Select API Keys
In the management menu, select the API Keys section to view the list of existing API keys or create new ones.
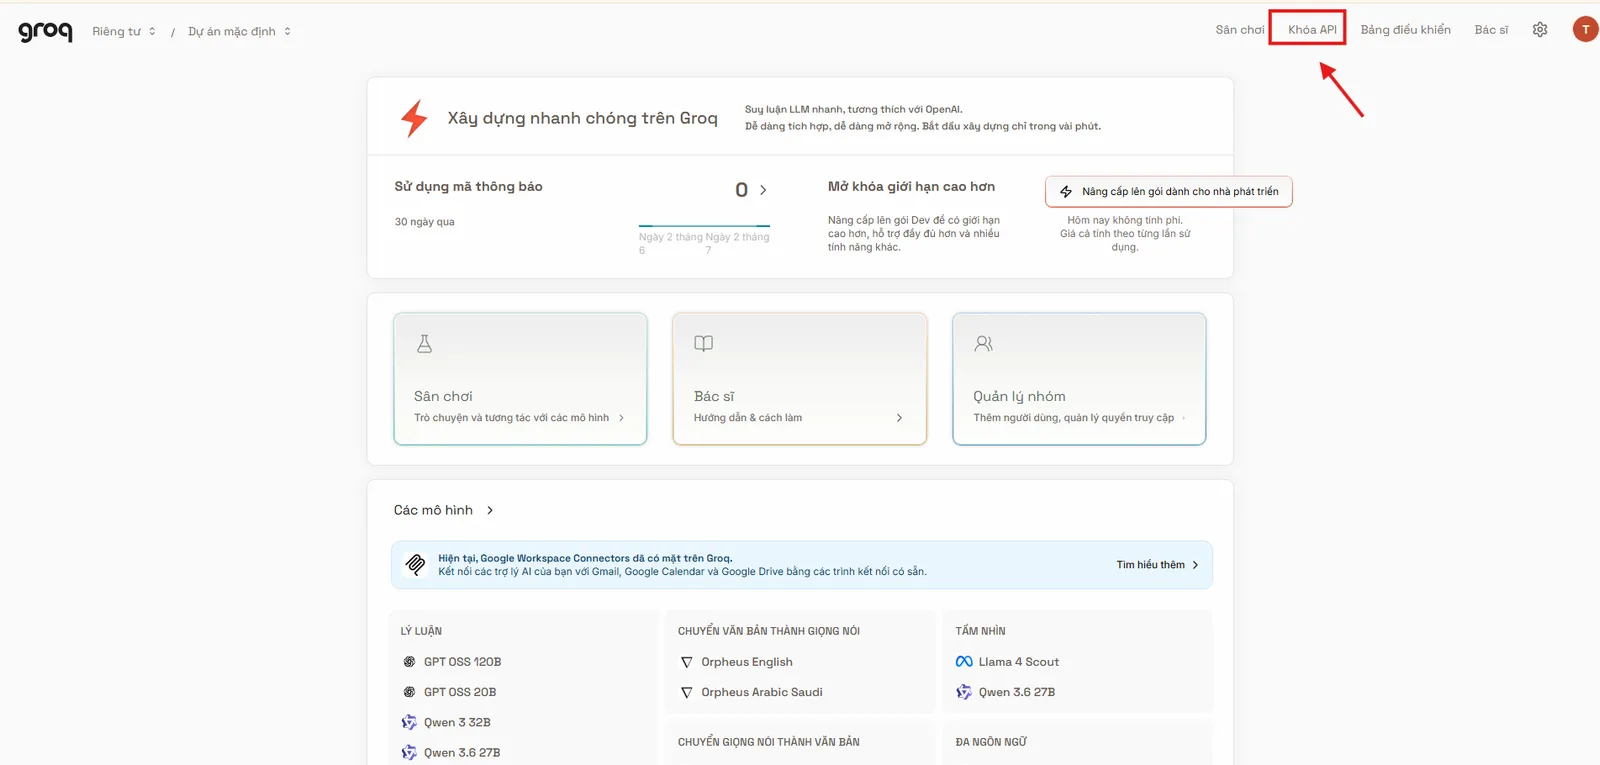
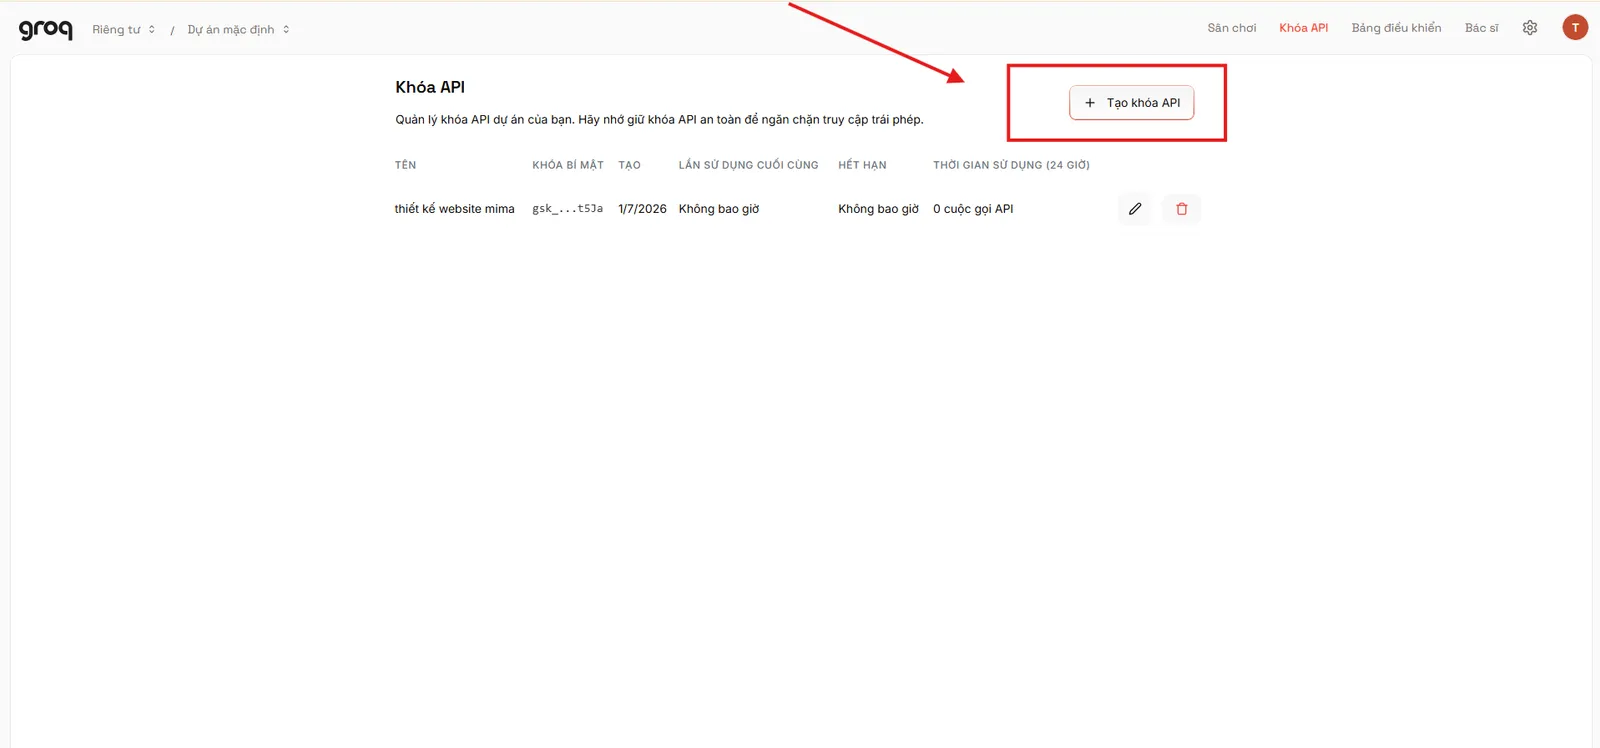
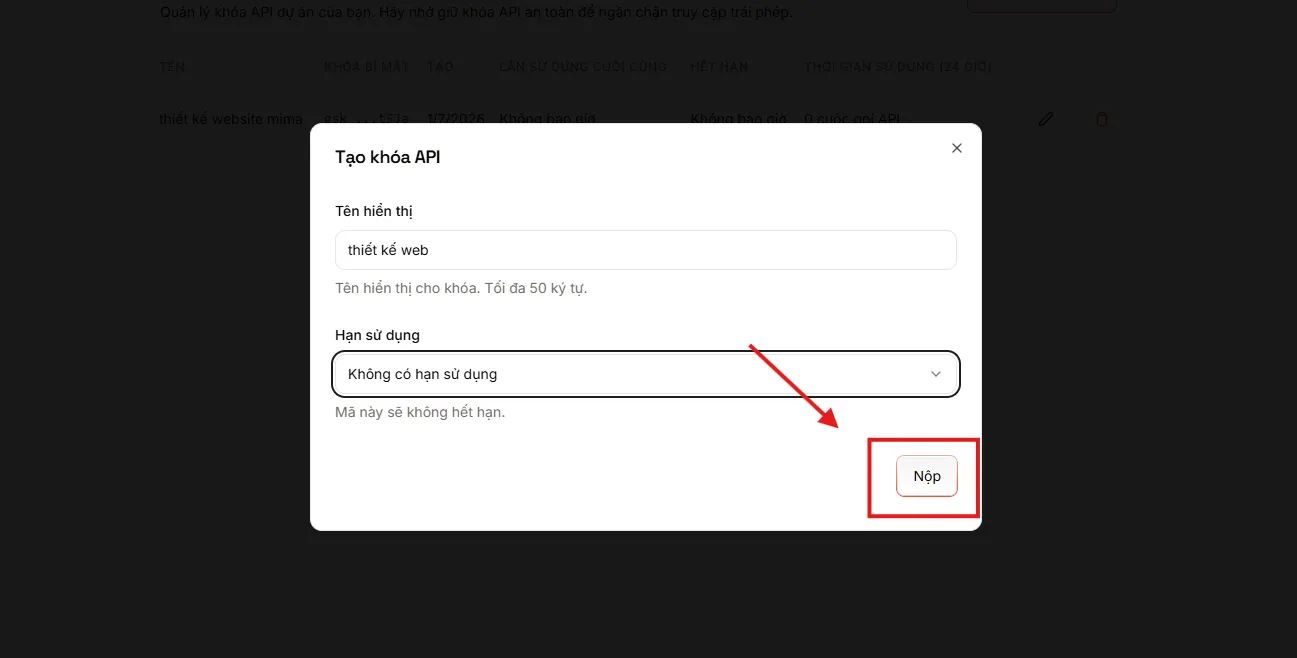
Step 6: Create a new API Key
Click the Create API Key button to start creating a new API key.
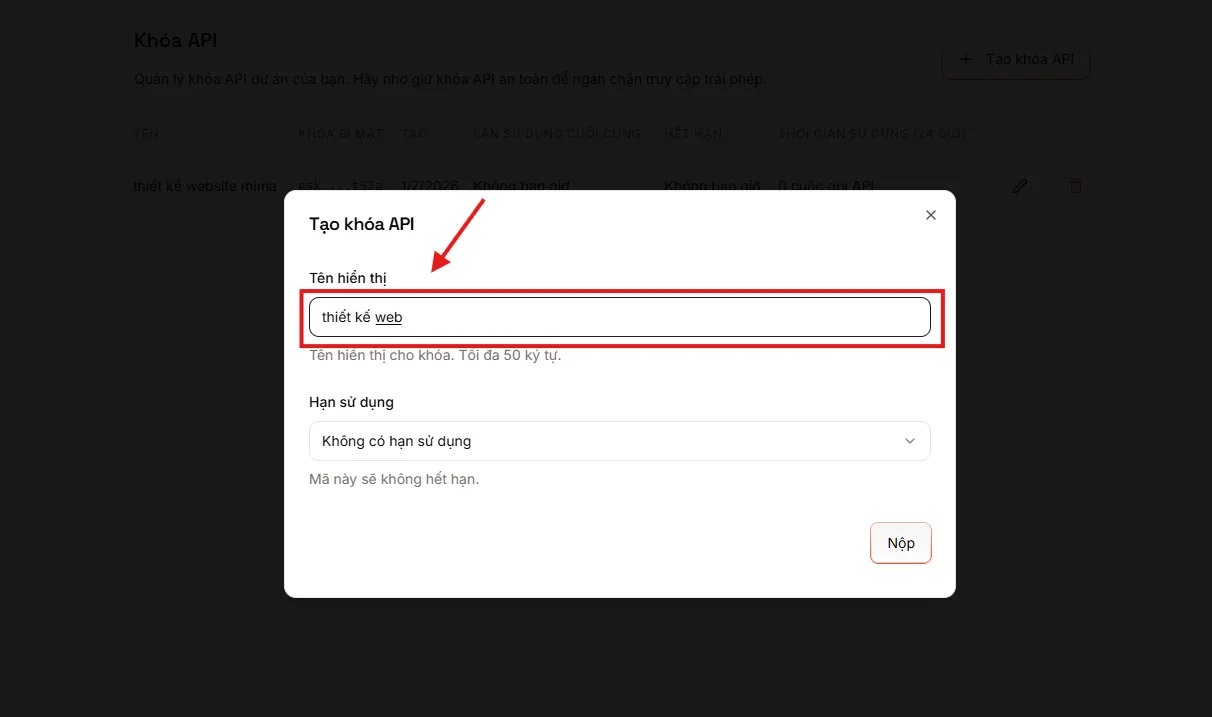
Step 7: Enter display name
In the Display Name field, enter a name to easily identify the API Key.
Example:
- MIMA AI
- Website SEO
- API Content
- AI Tool
This name only helps you manage the API Key; it does not affect its usage.
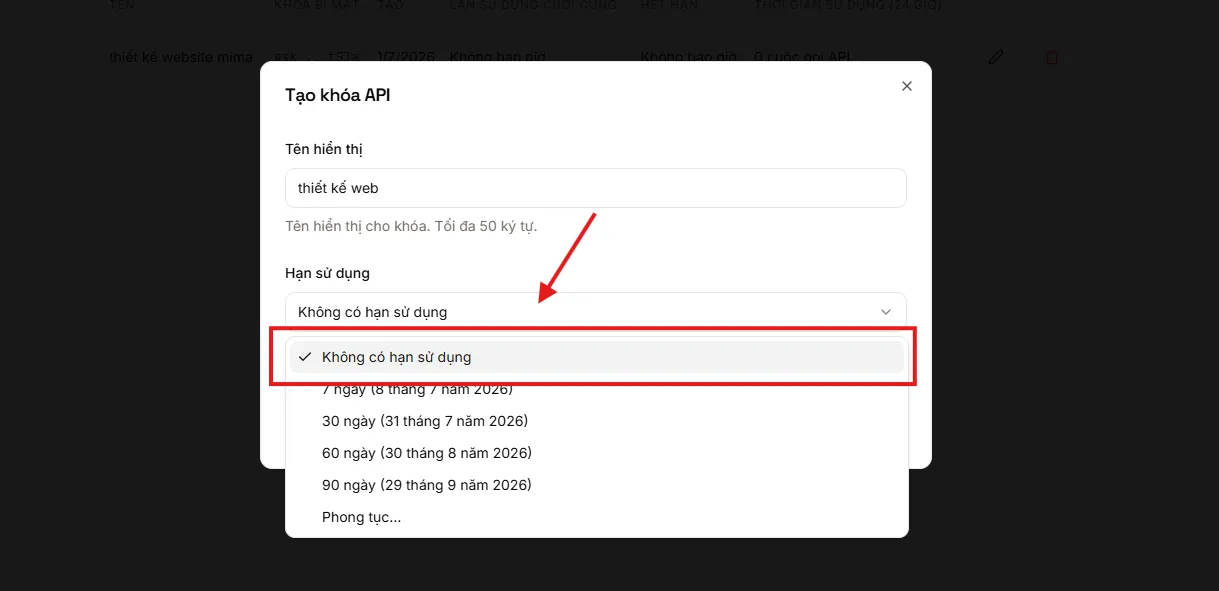
Step 8: Select expiration date
In the Expiration Date section, select:
No Expiration (No expiration date)
This ensures the API Key does not automatically expire during use. However, if the API Key is compromised, you should delete the old key and create a new one to ensure security.
Step 9: Click Submit
After completing the information, click Submit for the system to create the API Key.
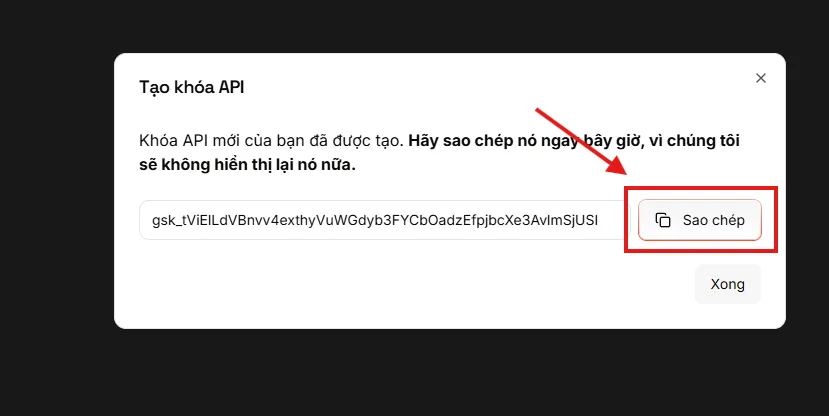
Groq will generate a new API key immediately. Once you leave this screen, you will not be able to view the entire API Key again, so copy and save it immediately.
Step 10: Copy API Key
Click Copy to copy the entire API code.
It is advisable to save the API Key in a secure location as this information is used to authenticate your account.
Step 11: Paste into the Google API Key section in the tool
Return to the AI tool's administration page.
In the Google API Key section, paste the copied Groq API Key into the input field as required by the system.
Note: The tool supports entering multiple API Keys simultaneously. You can enter several keys, separated by commas (,). To get additional usage quota, API Keys should be created from different Gmail accounts.
Step 12: Click Save
After successfully pasting the API Key, click Save to complete the setup process.
At this point, the tool is connected to Groq and ready for use.
Some Notes on Using Google Gemini API Key and Groq API Key
- Do not share API Keys with others.
- Do not post API Keys on websites or social media.
- If you suspect your API Key has been compromised, delete the old key and create a new one.
- You can create multiple API Keys to manage different projects.
- It's advisable to name API Keys according to their purpose for easy management.
Creating a Groq API Key is quite simple and takes only about 2–3 minutes. Once successfully created, you just need to paste the API Key into the AI tool to use Groq's high-speed AI models to assist with writing articles, creating content, and automating various other tasks.
If you encounter difficulties during the process of creating or integrating a Groq API Key into your system, please contact MIMA Digi's support team for quick assistance.
MIMA Digi Contact Information
If you need assistance creating a Google Gemini API Key, integrating AI into your website, or deploying an automated content writing system, please contact MIMA Digi for prompt advice.
- Address: 31/3B Thoi Tu 1 Hamlet, Dong Thanh Commune, Ho Chi Minh City, Vietnam
- Hotline: 0909 035 333
- Website: https://mimadigi.com
- Email: info@mimadigi.com
Contact MIMA Digi today for support in setting up the Google Gemini API and effectively and professionally applying AI to your SEO and Content Marketing activities.

_2gsqbg.webp)