

















Detailed A-Z Guide to Digitally Signing PDF Files with Foxit Reader
Today, digital signatures have become an important tool in the digital transformation process for businesses and individuals. Instead of printing, signing by hand, and then scanning documents to send to partners, users can directly sign PDF files in just a few minutes. One of the most commonly used software for this is Foxit Reader.
If you don't know how to digitally sign with Foxit Reader or are encountering difficulties, this article will provide detailed, step-by-step instructions from preparation to verifying the signature after completion.
What is Foxit Reader?
Foxit Reader is a PDF document reader and processing software chosen by many individuals, businesses, and organizations due to its fast operation, intuitive interface, and compatibility with various operating systems such as Windows, macOS, and Linux.
Beyond just reading PDF documents, Foxit Reader also offers numerous useful features such as content editing, adding annotations, filling out forms, document protection, and notably, support for digitally signing PDF files.

Why Do Many People Choose Foxit Reader for Digital Signatures?
Foxit Reader features a simple, user-friendly interface, allowing even new users to operate it quickly. The software supports various types of digital certificates, clearly displays signatory information on the document, and helps recipients easily verify the signature's validity.
Furthermore, Foxit Reader operates stably across various computer configurations, making it suitable for signing contracts, quotations, records, internal documents, and many other types of electronic documents.
What Are the Benefits of Digitally Signing PDF Files?
Using digital signatures on PDF documents not only saves time but also contributes to improving document management efficiency within businesses.
Save Document Processing Time
Instead of printing documents, signing them by hand, and then scanning them back into PDF files, users simply need to open the document and sign it directly on their computer. The entire process takes only a few minutes, which is especially suitable when dealing with a large volume of documents.
Ensure Legal Validity and Security
Digital signatures use digital certificates issued by a certification service provider. Once a document is successfully signed, any subsequent changes to its content can be detected, thereby protecting the document's integrity.
Support Remote Work
Users can sign documents anywhere with digital signatures, facilitating quick contract signing, document approvals, and task processing without the need for in-person meetings.
What Do You Need to Prepare Before Digitally Signing in Foxit Reader?
For a smooth signing process, you should check some necessary conditions beforehand.
Install Foxit Reader
First, download and install the Foxit Reader version compatible with your operating system. It's recommended to use the latest version to ensure full digital signature features and compatibility with digital certificates.
Prepare Your Digital Signature
You need a valid digital signature. You can use a USB Token or a remote digital signature service, depending on your business needs.
For USB Tokens, plug the device into your computer and check if it has been recognized.
Prepare the PDF File
Carefully review the document content before signing. If the document still requires editing, finalize all content before digitally signing to avoid having to re-sign.
How to Digitally Sign in Foxit Reader
Once you have prepared the software and digital signature, you can follow the steps below.
Step 1: Open the PDF File with Foxit Reader
First, launch the Foxit Reader software on your computer.
- On the main interface of the software, select File, then click Open or use the Ctrl + O keyboard shortcut to open the PDF document you wish to sign.
- After the document is opened, take a few minutes to review its entire content. This is a crucial step to ensure that there are no errors in contracts, quotations, records, or other documents before performing electronic signing.
- For important documents, you should also check if the file is locked for editing or requires a password to open. If the document is protected, unlock it before proceeding to the next steps.
Thorough checking from the outset will help limit the need for multiple re-signatures and ensure that the signed document is immediately usable.
Step 2: Select the Digital Signature Function in Foxit Reader
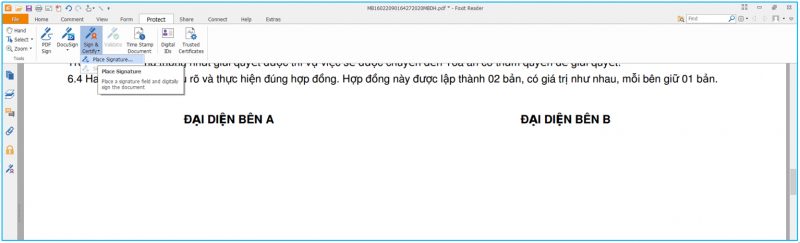
After opening the PDF file, select Protect on the Foxit Reader toolbar.
- Next, click Sign & Certify, then choose Place Signature to begin creating a signature on the document.
- At this point, the mouse pointer will change to signature area creation mode. Simply move the mouse to the desired location on the document to prepare for placing the digital signature.
If this document requires multiple signatories, identify your correct signing position to avoid affecting the document's layout.
Step 3: Select the Signature Display Location
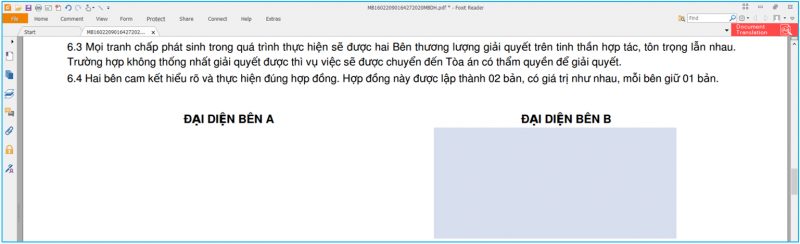
Move the mouse to the desired signing area on the PDF file, then click and drag the left mouse button to create a signature display box.
- The signature box size should be sufficient to display all information such as the signatory's full name, signing time, or company name, if configured.
- You should also place the signature in an easily visible location that does not obscure important document content. For contracts or administrative documents, the signature is typically placed at the bottom of the page or at a pre-defined location.
After completing this step, Foxit Reader will automatically display the signature information setup window for you to proceed with the next digital signing steps.
Step 4: Select the Digital Certificate and Configure Signature Information
Once you have selected the signature display location on the PDF file, Foxit Reader will show the digital signature setup window. This is a crucial step to ensure you choose the correct digital certificate before signing the document.

In this window, verify the displayed information such as:
- Sign As: Select the correct digital certificate to use for signing. If your computer has multiple digital certificates installed or uses different USB Tokens, carefully check the business name, signatory name, and certificate issuer to avoid signing with the wrong one.
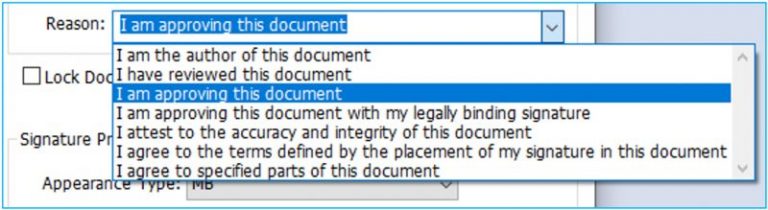
- Reason: Select or enter the reason for signing the document. For example: Signing a contract, approving a record, confirming a quote, or signing an internal document. Although this is not mandatory in all cases, clear declaration helps the recipient easily understand the purpose of the signature.
- Appearance Type: Choose the display style of the signature on the document.
If you want a more professional-looking signature, you can create a custom display style by selecting Create New Style. Foxit Reader allows you to customize various information such as the signatory's name, company name, signing date and time, or a signature image to suit your needs.
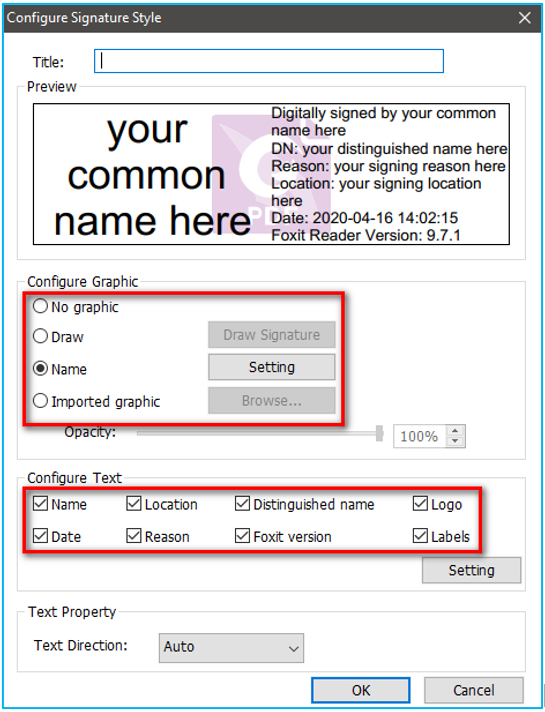
After verifying all information and ensuring the correct digital certificate is selected, click Sign to proceed to the next step.
Step 5: Save the PDF File After Signing
When you click Sign, Foxit Reader will prompt you to save the document as a new PDF file.
Choose an appropriate storage folder on your computer and name the file for easy management. It's recommended to use a different name from the original file, for example:
- HopDong_DaKy.pdf
- BaoGia_DaKy.pdf
- HoSo_DaKy.pdf
Saving as a new file allows you to retain the original unsigned PDF for future reference or editing.
Additionally, you should save the document to a shared company folder or cloud storage system if multiple people are collaborating on a project. This makes document management more convenient and reduces data loss.
After selecting the save location and file name, click Save for Foxit Reader to proceed to the digital signature authentication step.
Step 6: Enter USB Token Password to Authenticate the Signature
After saving the file, the system will display a window requesting digital signature authentication.
- If you are using a USB Token, Foxit Reader will prompt you to enter the device's password (PIN).
- Enter the correct password that was provided when activating the USB Token. Then click Login or OK to confirm.
- If the password is entered incorrectly multiple times consecutively, the USB Token may be locked to ensure the security of the digital certificate. Therefore, you should enter it accurately and avoid multiple attempts if you don't remember the password.
- If using a remote digital signature, the system will send an authentication request to your phone application or authentication device. You simply need to open the application, verify the transaction information, and confirm to complete the signing.
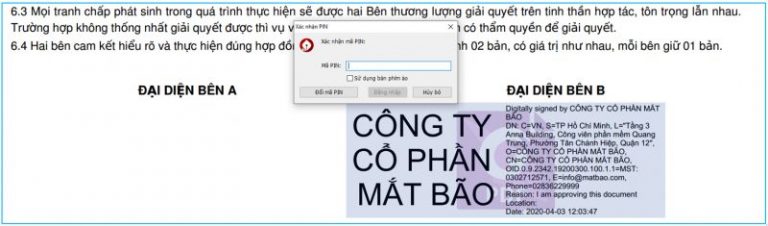
After successful authentication, Foxit Reader will automatically embed the digital signature into the PDF document.
Step 7: Complete Digital Signing on the PDF File
Once the authentication process concludes, the digital signature will be displayed at the location you previously selected.
Depending on the configured display style, the signature may include information such as:
- Full name of the signatory.
- Company name.
- Signing time.
- Digital certificate information.
Signature verification icon.
This indicates that the digital signing process has been successfully completed.
You should take a few minutes to re-check the entire document, ensuring the signature is displayed in the correct position and does not obscure important content.
If the document requires multiple signatories, you can forward the PDF file to the next signatory after completing this step.
Step 8: Verify the Digital Signature After Completion
After successful signing, the final step is to check the digital signature's verification status to ensure the document can be used in electronic transactions.
There are two simple ways to check:
Check Directly on the Signature
Click on the signature area on the PDF document.
Foxit Reader will display detailed information about the digital signature, such as:
- Full name of the signatory.
- Name of the organization or business.
- Signing time.
- Certificate issuing authority.
- Verification status.
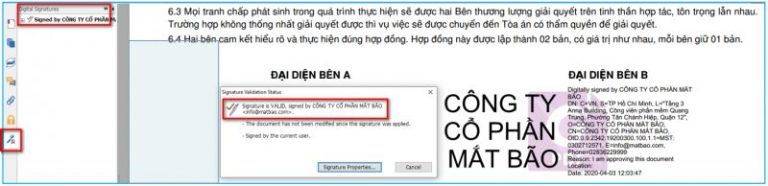
If the signature displays a valid status, the document has been successfully signed and can be sent to partners or receiving authorities.
Check in Signature Properties
In addition to clicking directly on the signature, you can also open the Signature Properties to view detailed verification information.
Here, Foxit Reader will provide complete data about the digital certificate used, the signing time, and the signature's status. If a "valid signature" message appears, it indicates that the document has not been altered after signing and the signature remains effective.
Checking the signature before sending the document is a step that should be performed in all electronic transactions to minimize errors and ensure the document is accepted when dealing with clients, partners, or government agencies.
Important Notes How to Digitally Sign PDF Files in Foxit Reader
To minimize errors, please keep the following notes in mind:
Check Digital Certificate Validity
- If the certificate has expired, you will not be able to sign documents.
- Renew the certificate before attempting to sign.
Do Not Edit After Signing
- Editing the content after signing may invalidate the digital signature's verification status.
- If content changes are needed, edit the document first and then re-sign it.
Regularly Update Software
- Newer versions of Foxit Reader often come with improved features and compatibility.
- Updating the software will help reduce errors during the signing process.
Common Errors When Digitally Signing in Foxit Reader
USB Token Not Recognized
- This can be caused by incorrectly installed drivers or a faulty USB port.
- You should check the drivers or try connecting to a different USB port.
Digital Certificate Not Displayed
- Check if the digital certificate has been correctly installed and if it is still valid.
- If necessary, restart your computer before trying again.
Signature Not Verified
- This error usually occurs if the document has been altered after signing or if the digital certificate is no longer valid.
- Check the certificate status and re-sign the document if necessary.
Foxit Reader is an effective tool for digitally signing PDF files, suitable for the needs of businesses and individuals in processing electronic documents. With its user-friendly interface and simple steps, users can quickly complete digital signing, ensuring document integrity and convenient sharing.
We hope this article has helped you understand the digital signing process in Foxit Reader, as well as important considerations during its use. By following the steps correctly and thoroughly checking before sending documents, you will save significant time and enhance work efficiency in the digital environment.
MIMA TRADING AND SERVICES CO., LTD
- Address: 31/3B Ấp Thới Tứ 1, Xã Đông Thạnh, TP Hồ Chí Minh, Việt Nam
- Hotline: 0909 035 333
- Website: https://mimadigi.com
- Email: info@mimadigi.com












Share your review